Do you need Remote Support?
Remote Support using “Zoho Assist”
What is Zoho Assist?
“Zoho Assist” is a Remote Assistance Service that allows PickleIT support to troubleshoot technical issues or tutor you on your computer over the Internet while talking with you on the phone. Zoho Assist works on Windows, Mac, Linux, IOS, Andriod and ChromeOS..
What can Remote Support be used for?
While not all computer problems can be solved remotely, a large majority of problems can be, such as:
- Virus/Spyware Removal and Prevention.
- OS Troubleshooting and Repair.
- Assisted Data Backup and Recovery.
- Computer Tutoring (Microsoft Office, Digital Video Editing, Internet, etc.)
- Computer Performance Optimization.
- Software Installation, Uninstallation and Repair.
- Advanced Diagnostics.
- Printer, Scanner, Camera, etc., installation and troubleshooting.
- System Cleaning.
- Network Security Analysis and Optimization.
- Much more…
With PickleIT Support, you are guaranteed the most rapid response time when you are in need of technical support. Whether you are an average home user, or a travelling business user, I can be there virtually to help you with your computer in an instant no matter where you are.
How do I use PickleIT Support?
Here are the steps needed in order to start a remote support session:
- Contact Pickle IT by phone, text/sms, email, Messenger or WhatsApp.
- You will be directed to download, install and run the quick support client, using the instructions below:
Step 1 Download the quick support agent.
https://assist.zoho.com/install-customer-plugin?cxp_token=cf99a414e5bd691d9367f47271a4cc816141c28e67321d9cd05eec5f2a40c27e&type=exeStep 1a If prompted to save or open, click on the open button. The quick support agent will automatically install. If you see the following error during install, click the OK button.

Step 1b The quick support agent is now installed, proceed to step 3. If you weren’t prompted to save or open, proceed to step 2.
Step 2 Find and run the quick support agent installer.
- Find the download: if you weren’t prompted to for a location to save the download, the file should be in one of the following location:
- Windows: C:Users\<user>\Downloads
- Run the downloaded file.
- On windows the downloaded file is called: CustomerPlugin.exe
- Double-click on the downloaded file to run the Quick Support plugin installer. The quick support plugin will automatically install. If you see the following error during install, click the OK button.
Step 3 Run the quick support Quick Support Agent.
- You can run the Quick Support Agent by either:
- Clicking on the start button, typing Zoho Assist, then press the enter key.
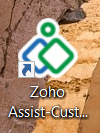
- Double clicking the icon on on the desktop. Example below:
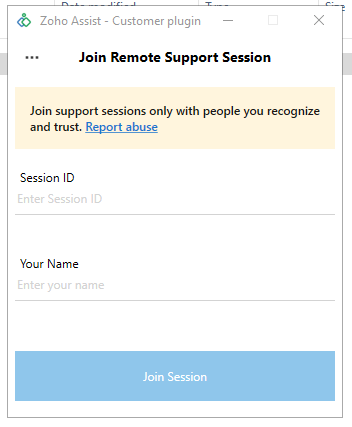
Step 4 Joining a Session Using Quick Support.
- Enter the Session ID given to you by the technician.
- In the Your Name box, type your own name.
- Click Join Session.
- Your technician should now be able to see your screen and move you mouse cursor.
Step 5 Ending a session.
- There are two ways to end the session:
- You can ask the technician to end session on their end, or they may end the session without being prompted (if they believe the session is finished).
- Click the End Session button on the onscreen widget (which is normally in the bottom right-hand corner of your screen).
Step 1 Download the quick support agent from:.
https://assist.zoho.com/download-quick-support?quick_support_token=f01606a2111c8b29165f629f6099ca8040682d7617e341812a43dcd447bcc8b1cdfc0fb1e8ef93c5670a679532fa8616&os=macStep 2 Find and run the quick support agent.
- Find the download: if you weren’t prompted to for a location to save the download, the file should be in one of the following locations:
- MacOS: /Users/<user>/Downloads
- Joining a Session Using Quick Support
- Open the Zoho Assist – Quick Support plugin.
- Select the Join Session tab.
- Enter the Session ID shared by the technician and your Name.
Step 6 Ending a session.
- There are two ways to end the session:
- You can ask the technician to end session on their end, or they may end the session without being prompted (if they believe the session is finished).
- Click the End Session button on the onscreen widget (which is normally in the bottom right-hand corner of your screen).
Step 1 Open a terminal application.
Step 2 Download the quick support agent using the following command.
wget "https://assist.zoho.com/install-quick-support?quick_support_token=05cb43e83dd487487795d83a83d8e254e5d34649f5f4933487c06e23e7c6550b086454db1a1256f10433c796e46e5c97&os=linux&version=64bit" -O zohoassist_common_amd64.zipStep 3: :Install the downloaded quick support agent using the following command.
unzip zohoassist_common_amd64.zip && chmod +x install.bin && ./install.binStep 4 Run the Quick Support agent. You should be able to find the program/app icon in one of the three locations:
- Desktop
- Menu
- Dock/Dash
Step 5 Joining a Session Using Quick Support.
- Enter the Session ID given to you by the technician.
- In the Your Name box, type your own name.
- Click the Join Session button.
- Your technician should now be able to see your screen and move you mouse cursor.
Step 6 Ending a session.
- There are two ways to end the session:
- You can ask the technician to end session on their end, or they may end the session without being prompted (if they believe the session is finished).
- Click the End Session button on the onscreen widget (which is normally in the bottom right-hand corner of your screen).
Step 1 Download customer support app from the Google Play store.

Step 2 Open the Customer support app.
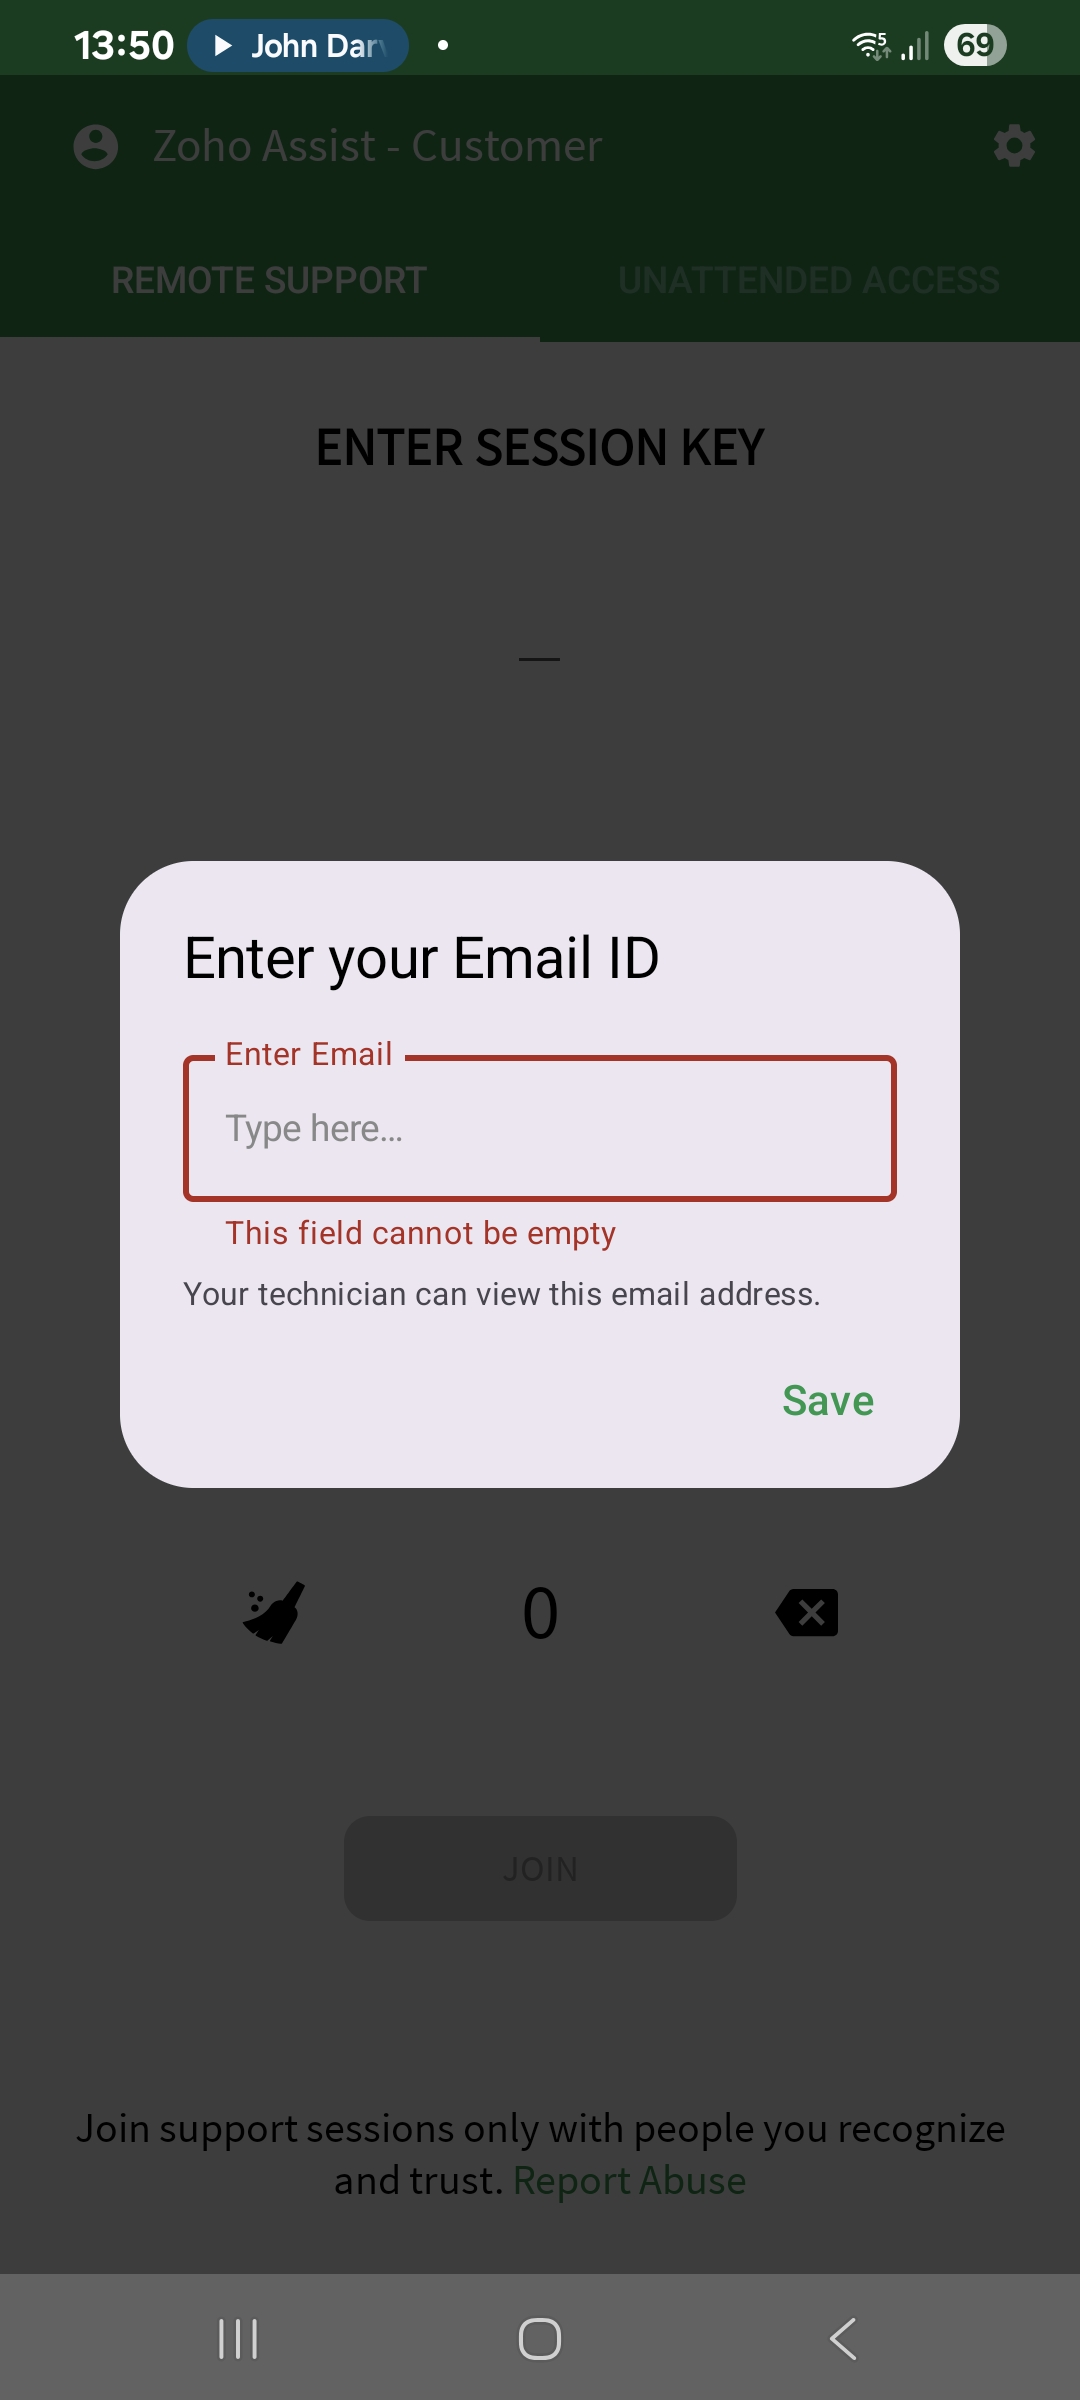
Enter your email address when prompted.
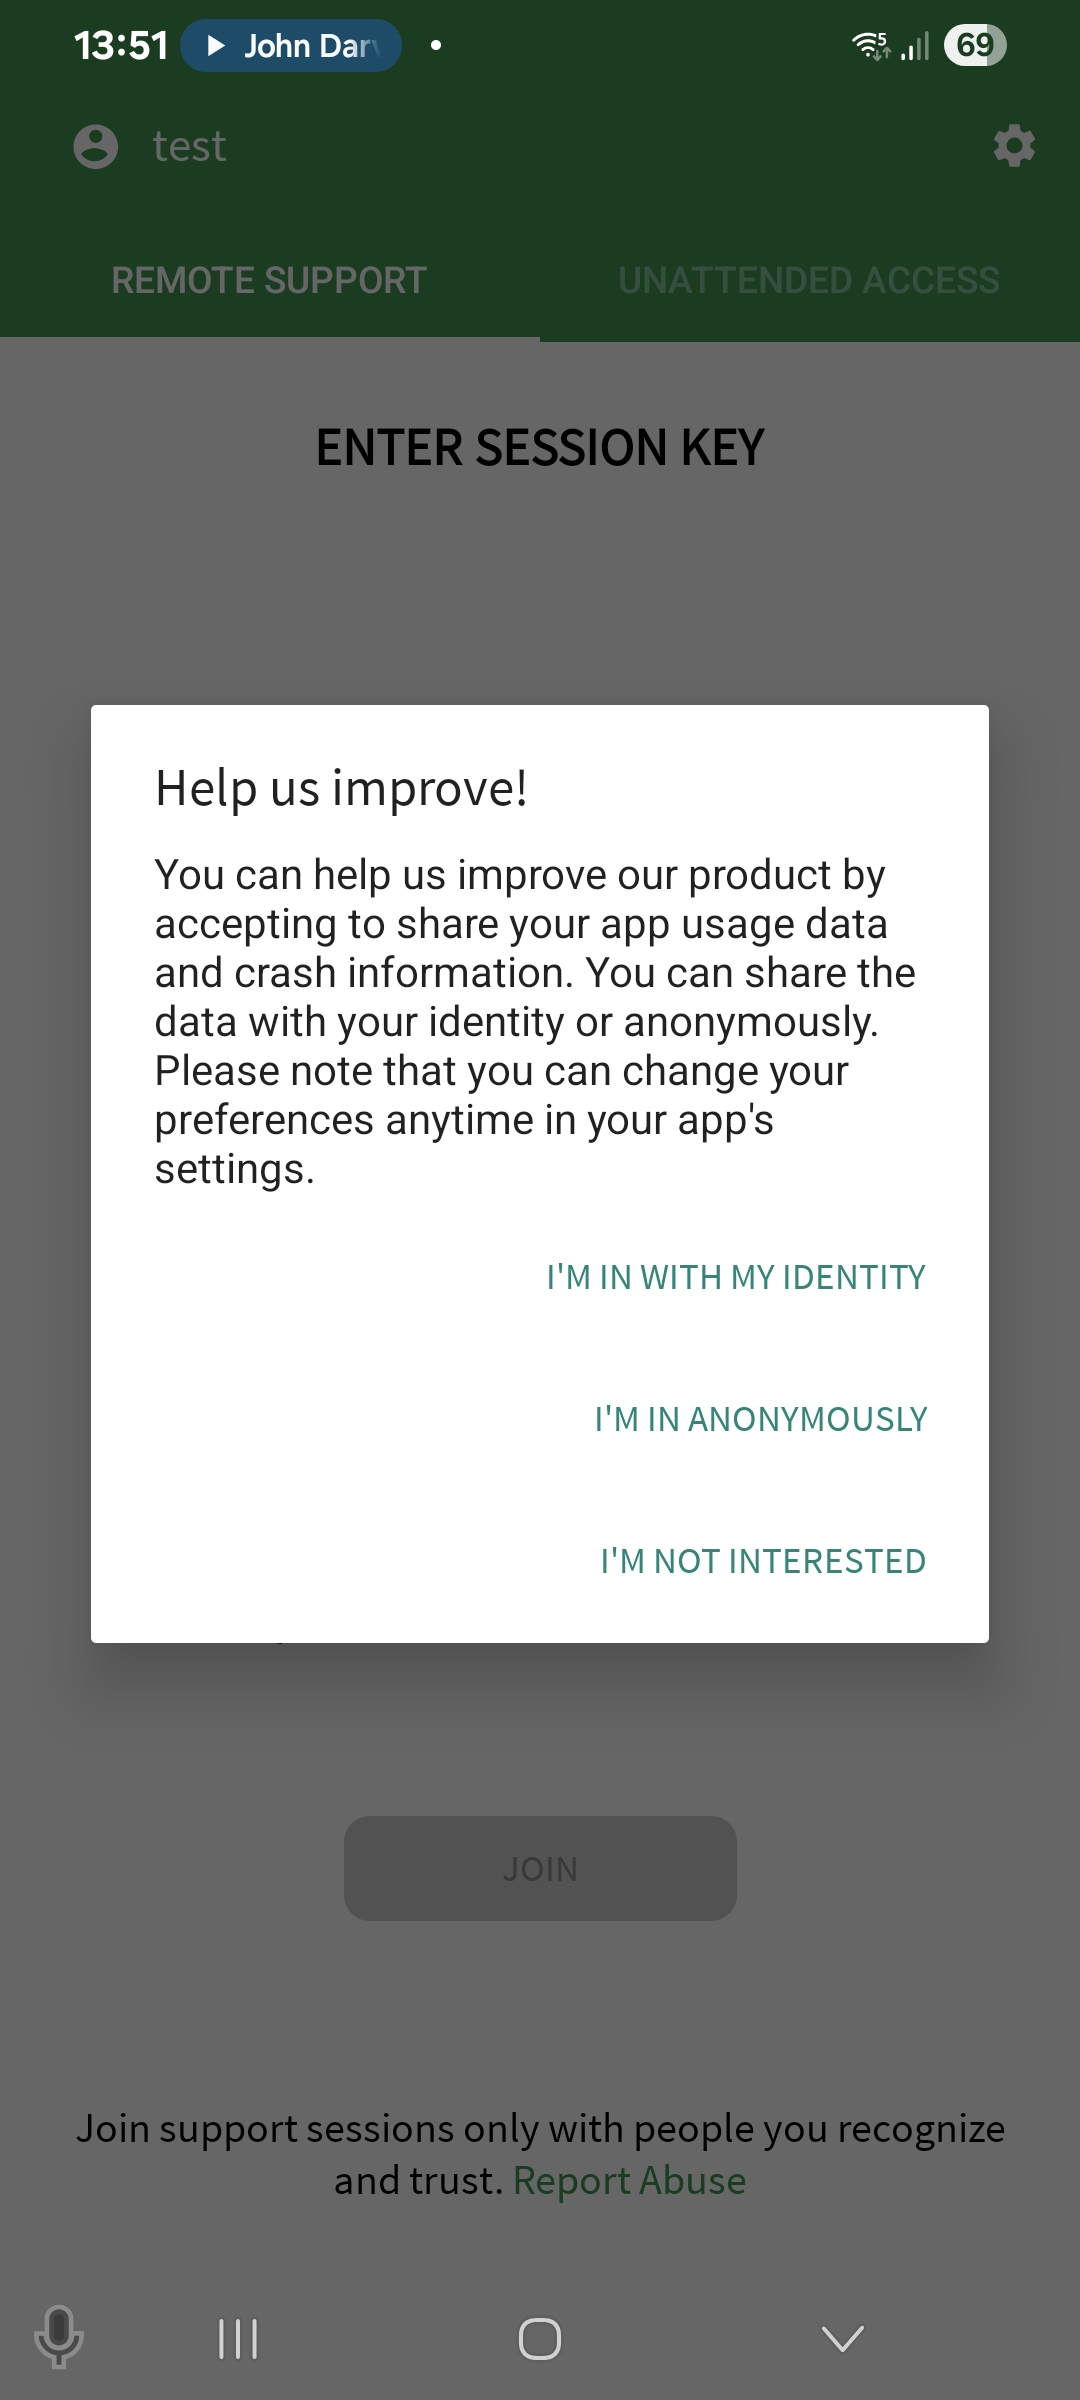
Step 3 One time prompt
- The first time you open the app you will be shown the “usage data and crash information” sharing prompt.
- You can choose any of three options presented.
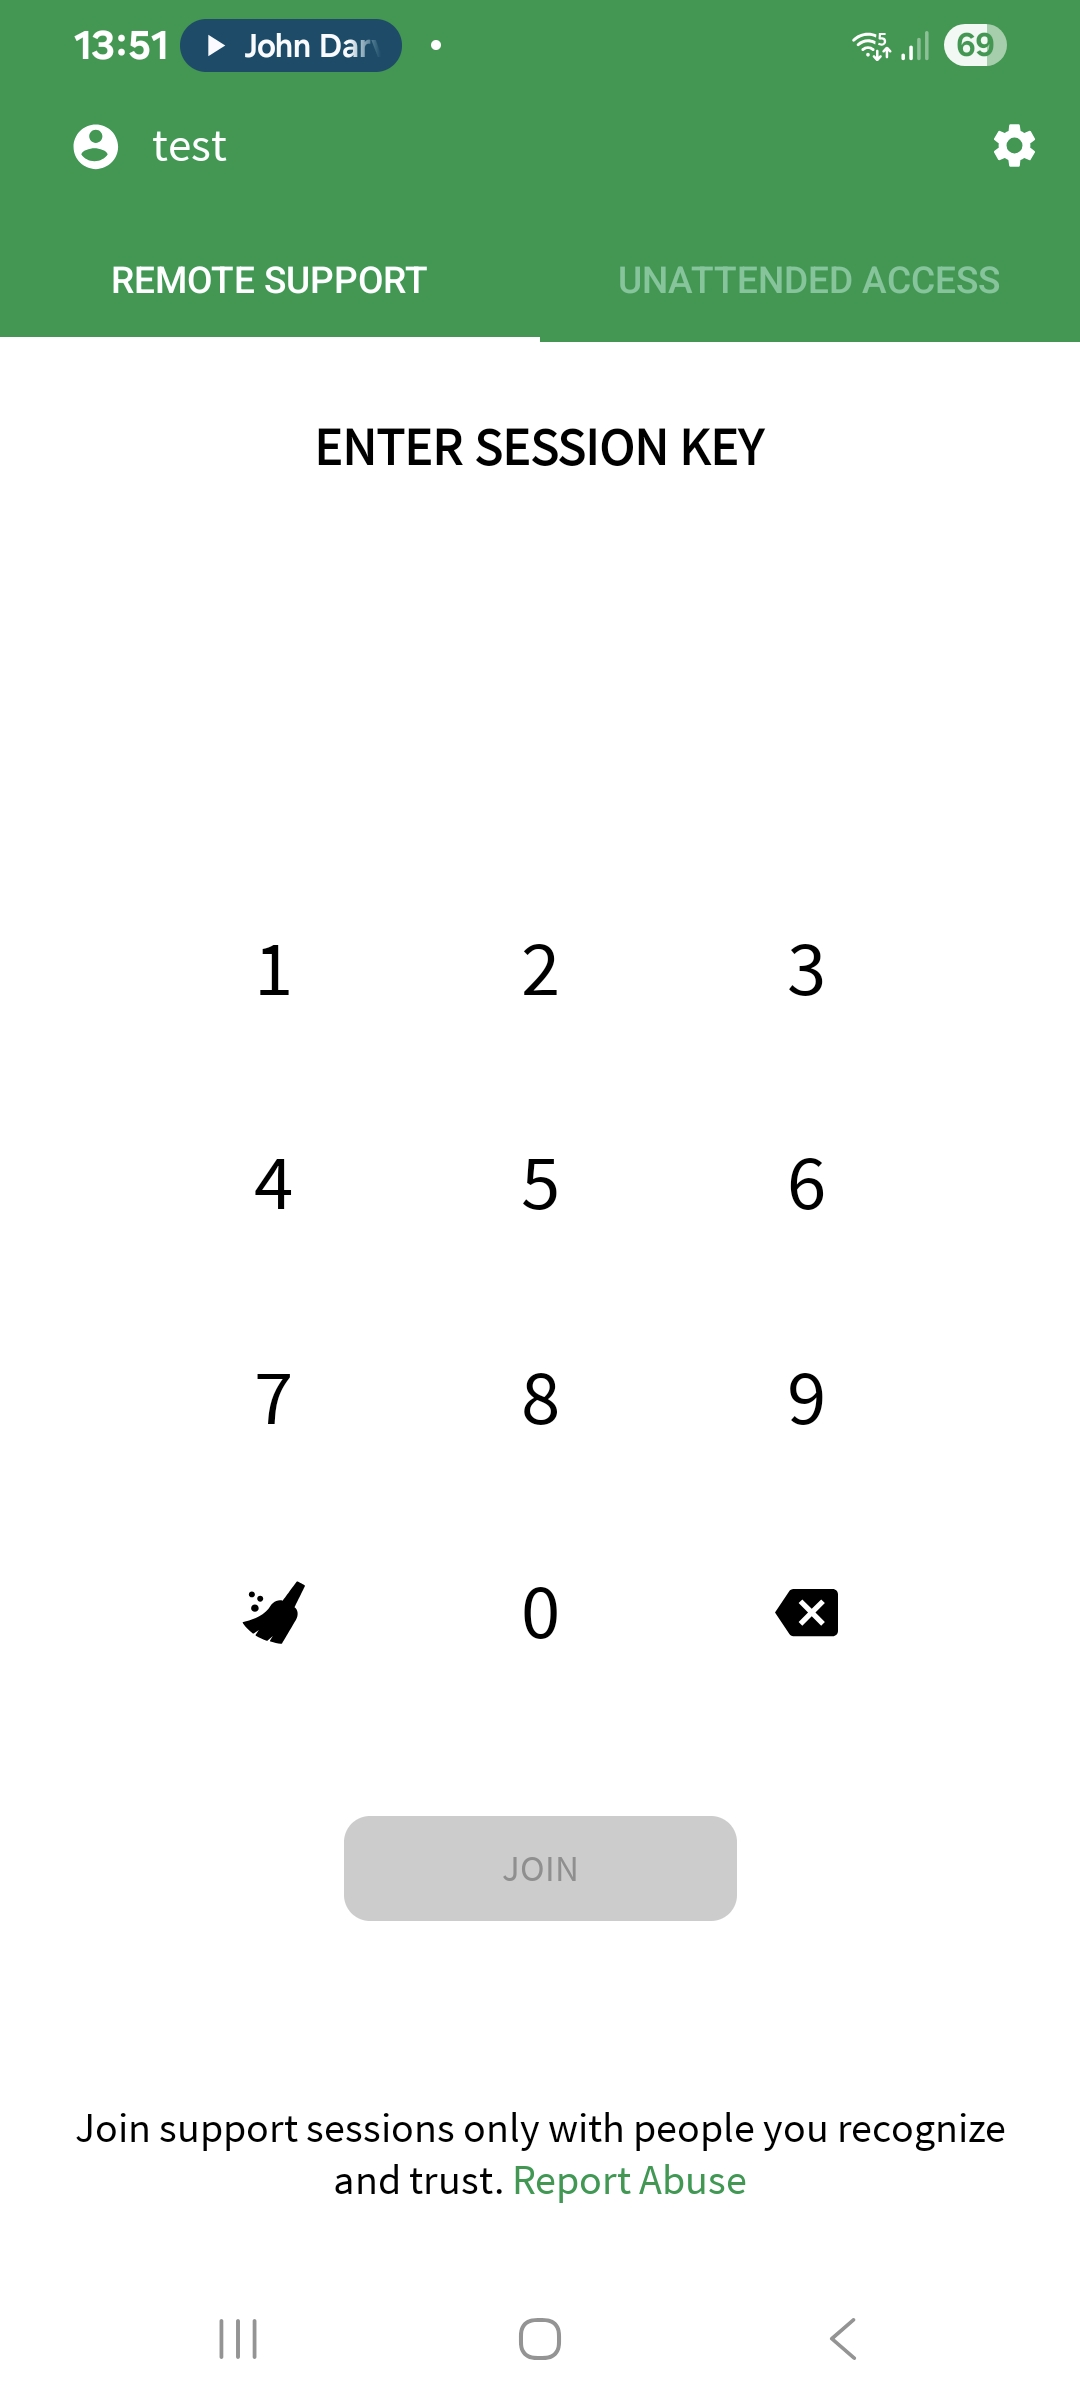
Step 4 – Joining a Session Using Quick Support.
- Enter the Session ID given to you by the technician.
- Tap Join Session.
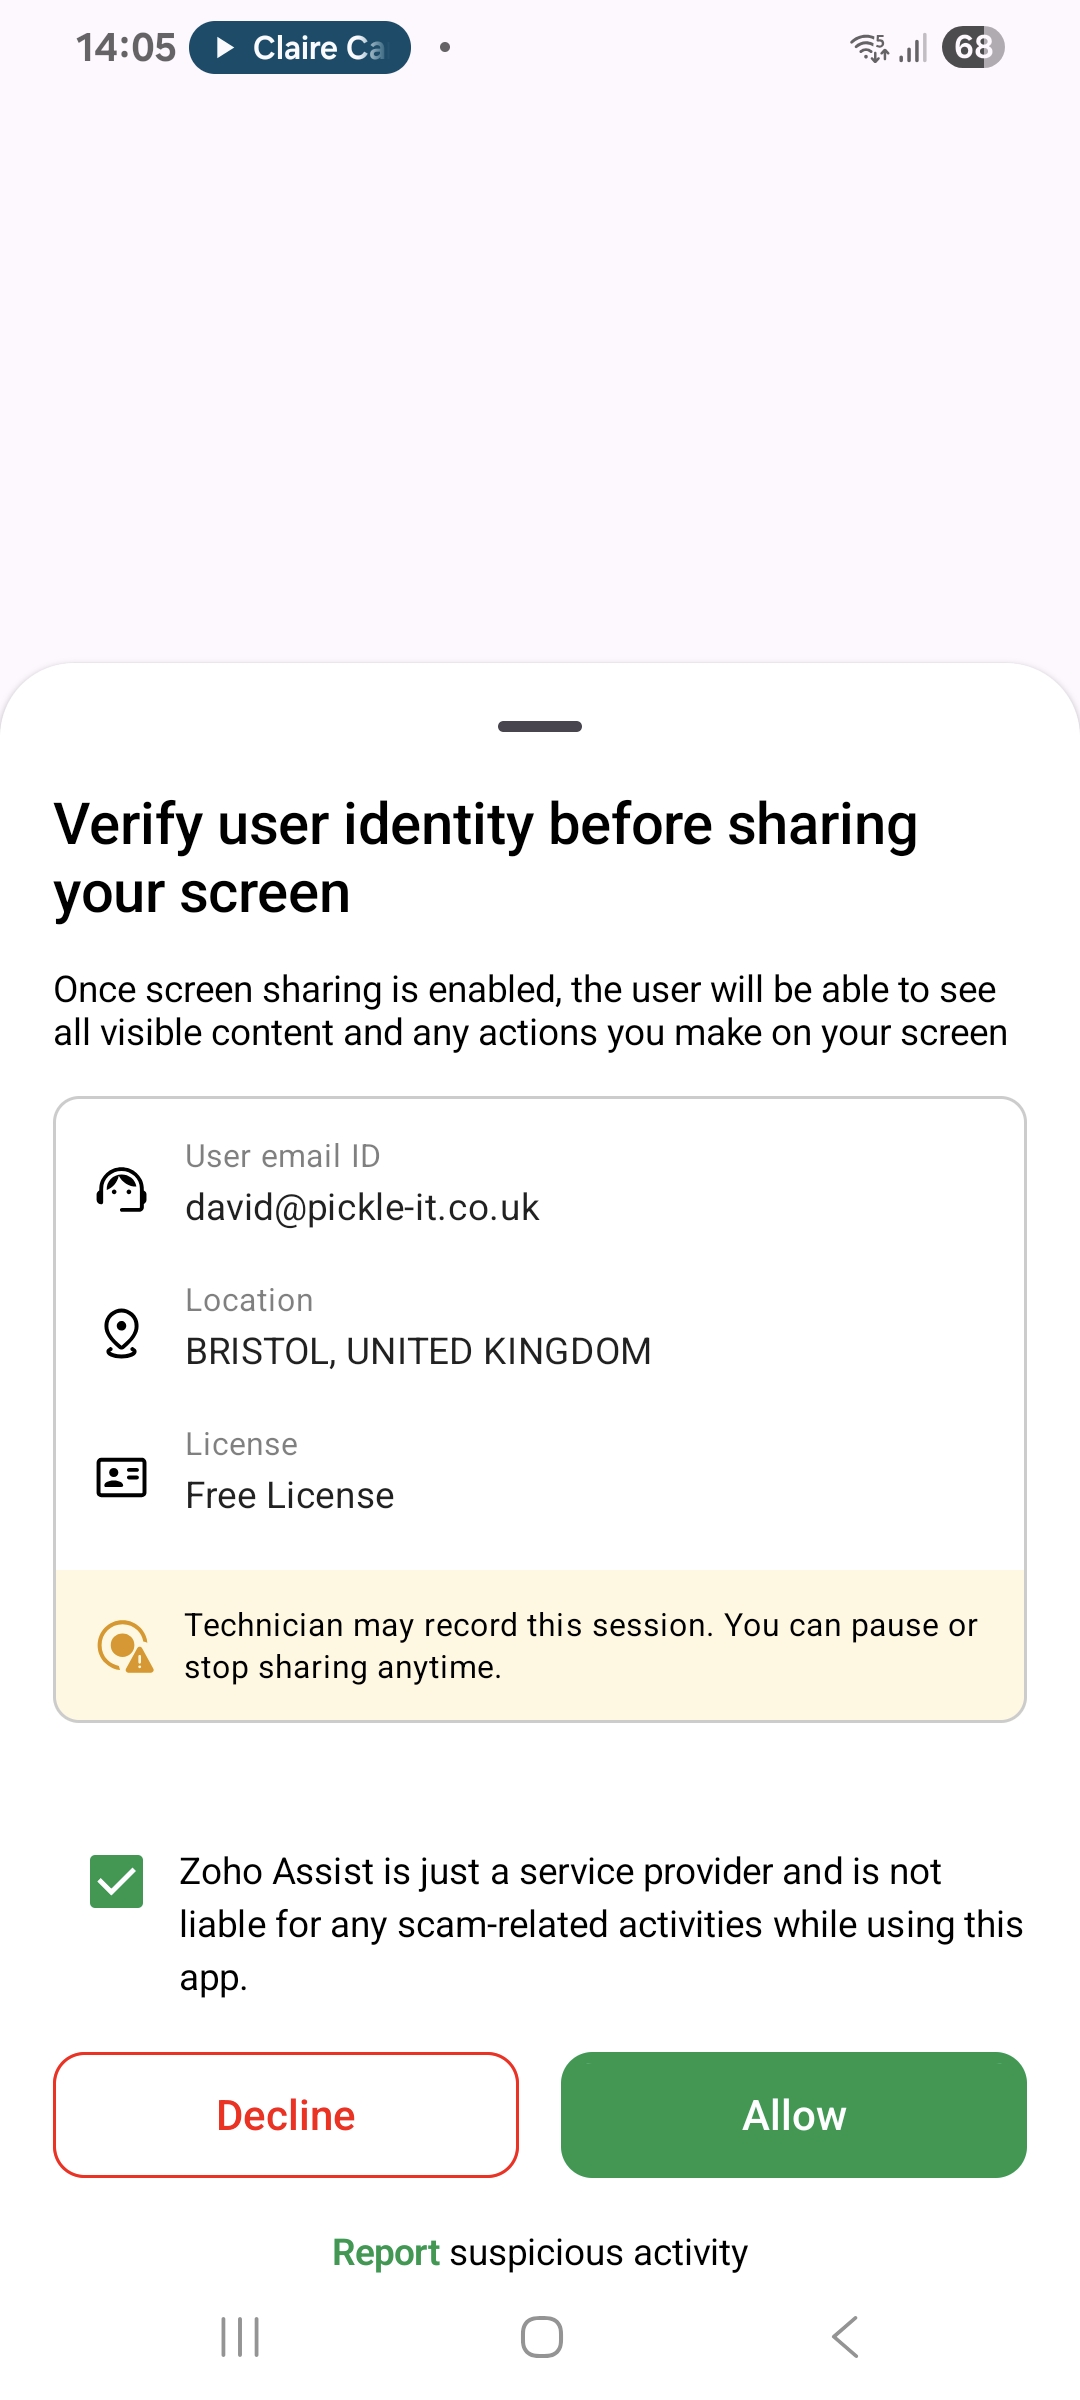
Step 5 – Verify the technician
- If you are happy with the details presented on your screen (of the person who is trying to connect to your android device) tap on the checkbox, then tap the allow button.
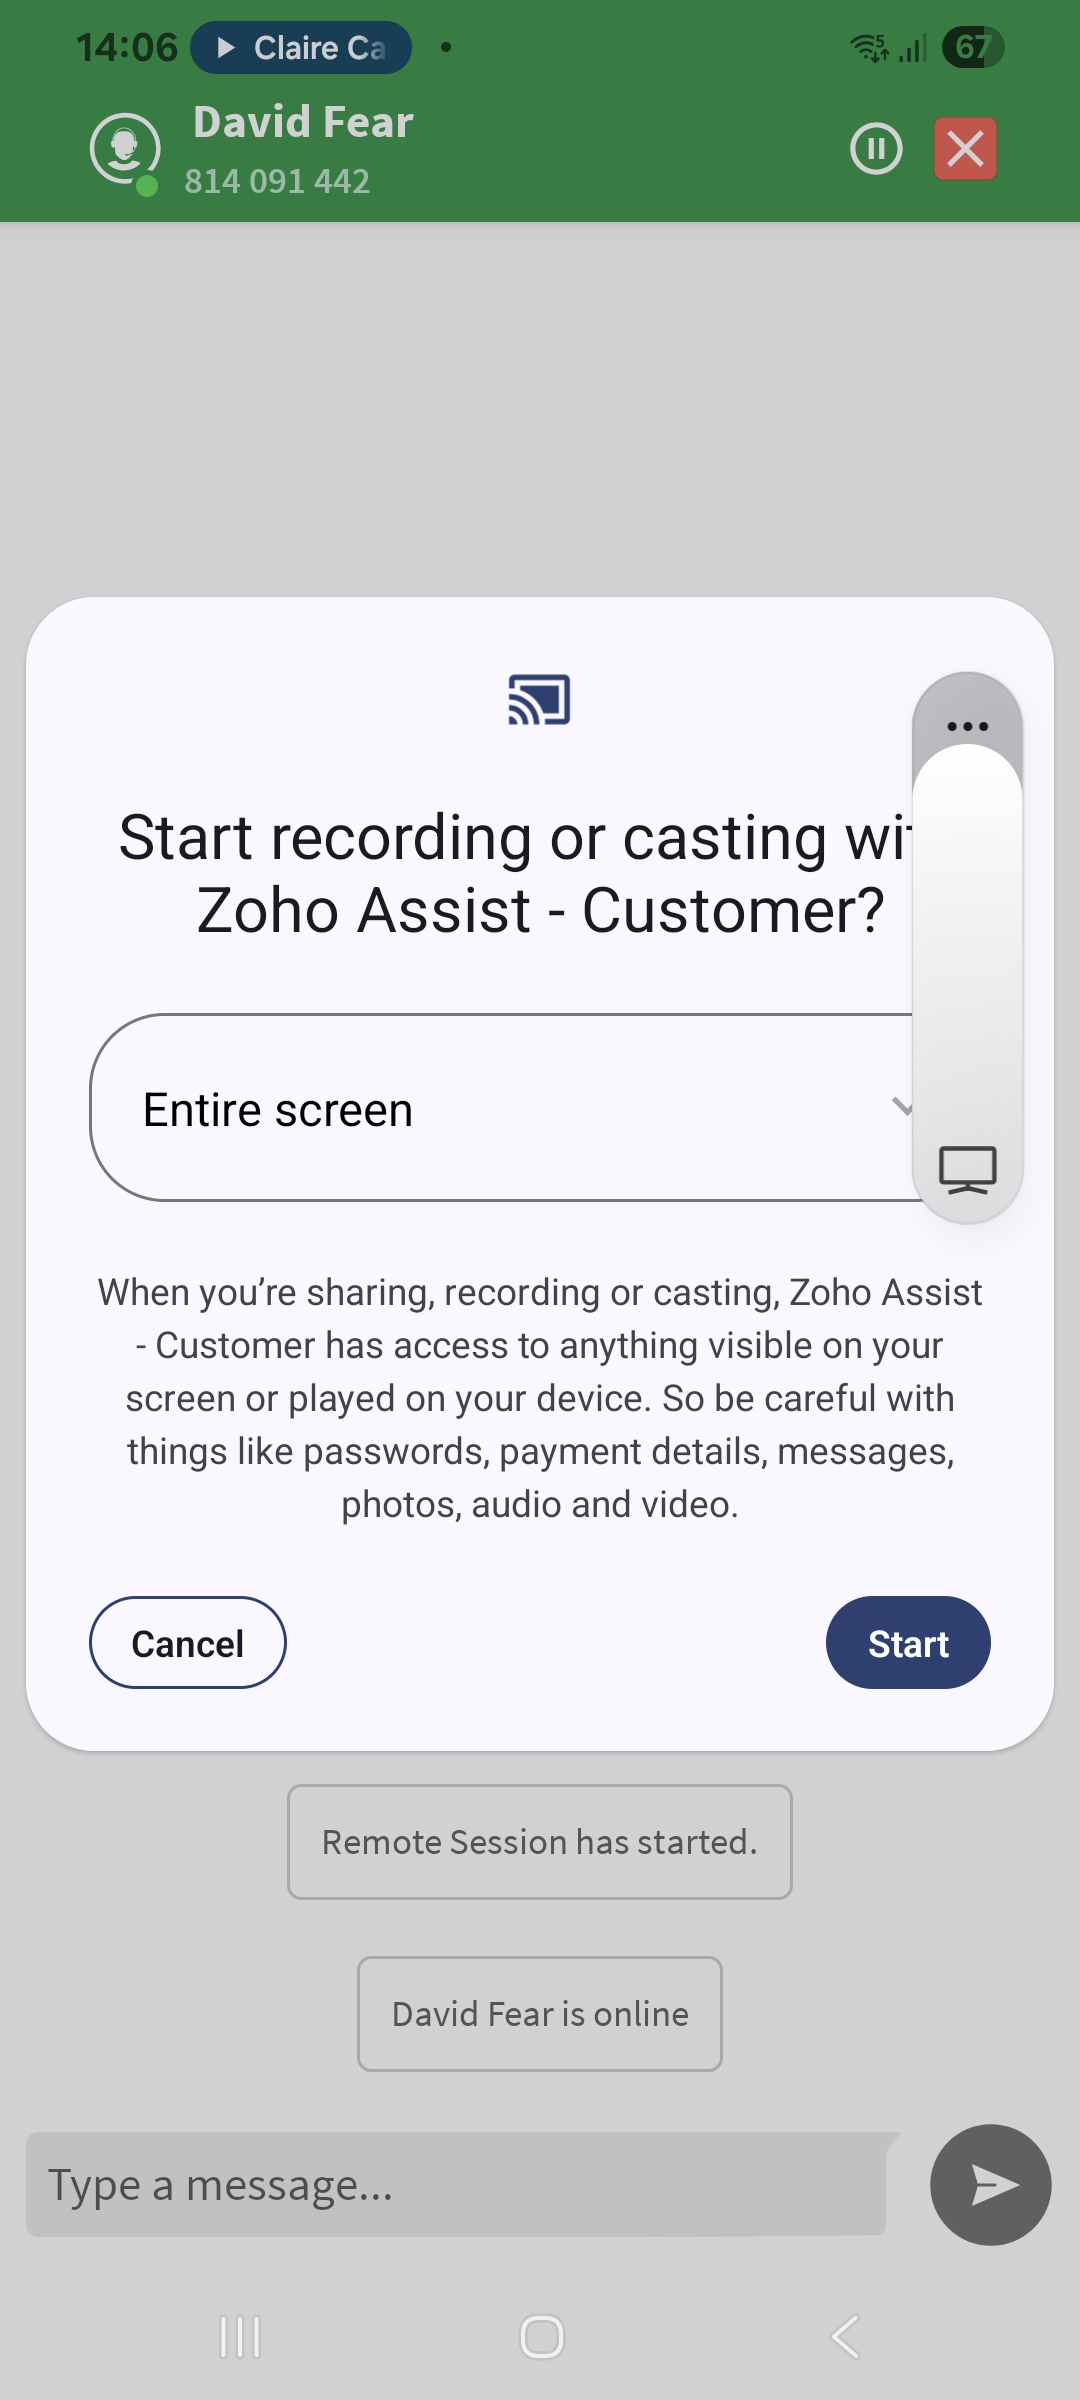
Step 6 – screen casting option screen.
- You are presented with two options of what to share with the technician.
- The two options are: “Entire screen” or “Single app”.
- If you have asked the technician for general android support, select “entire screen”.
- Tap on the start button to continue.
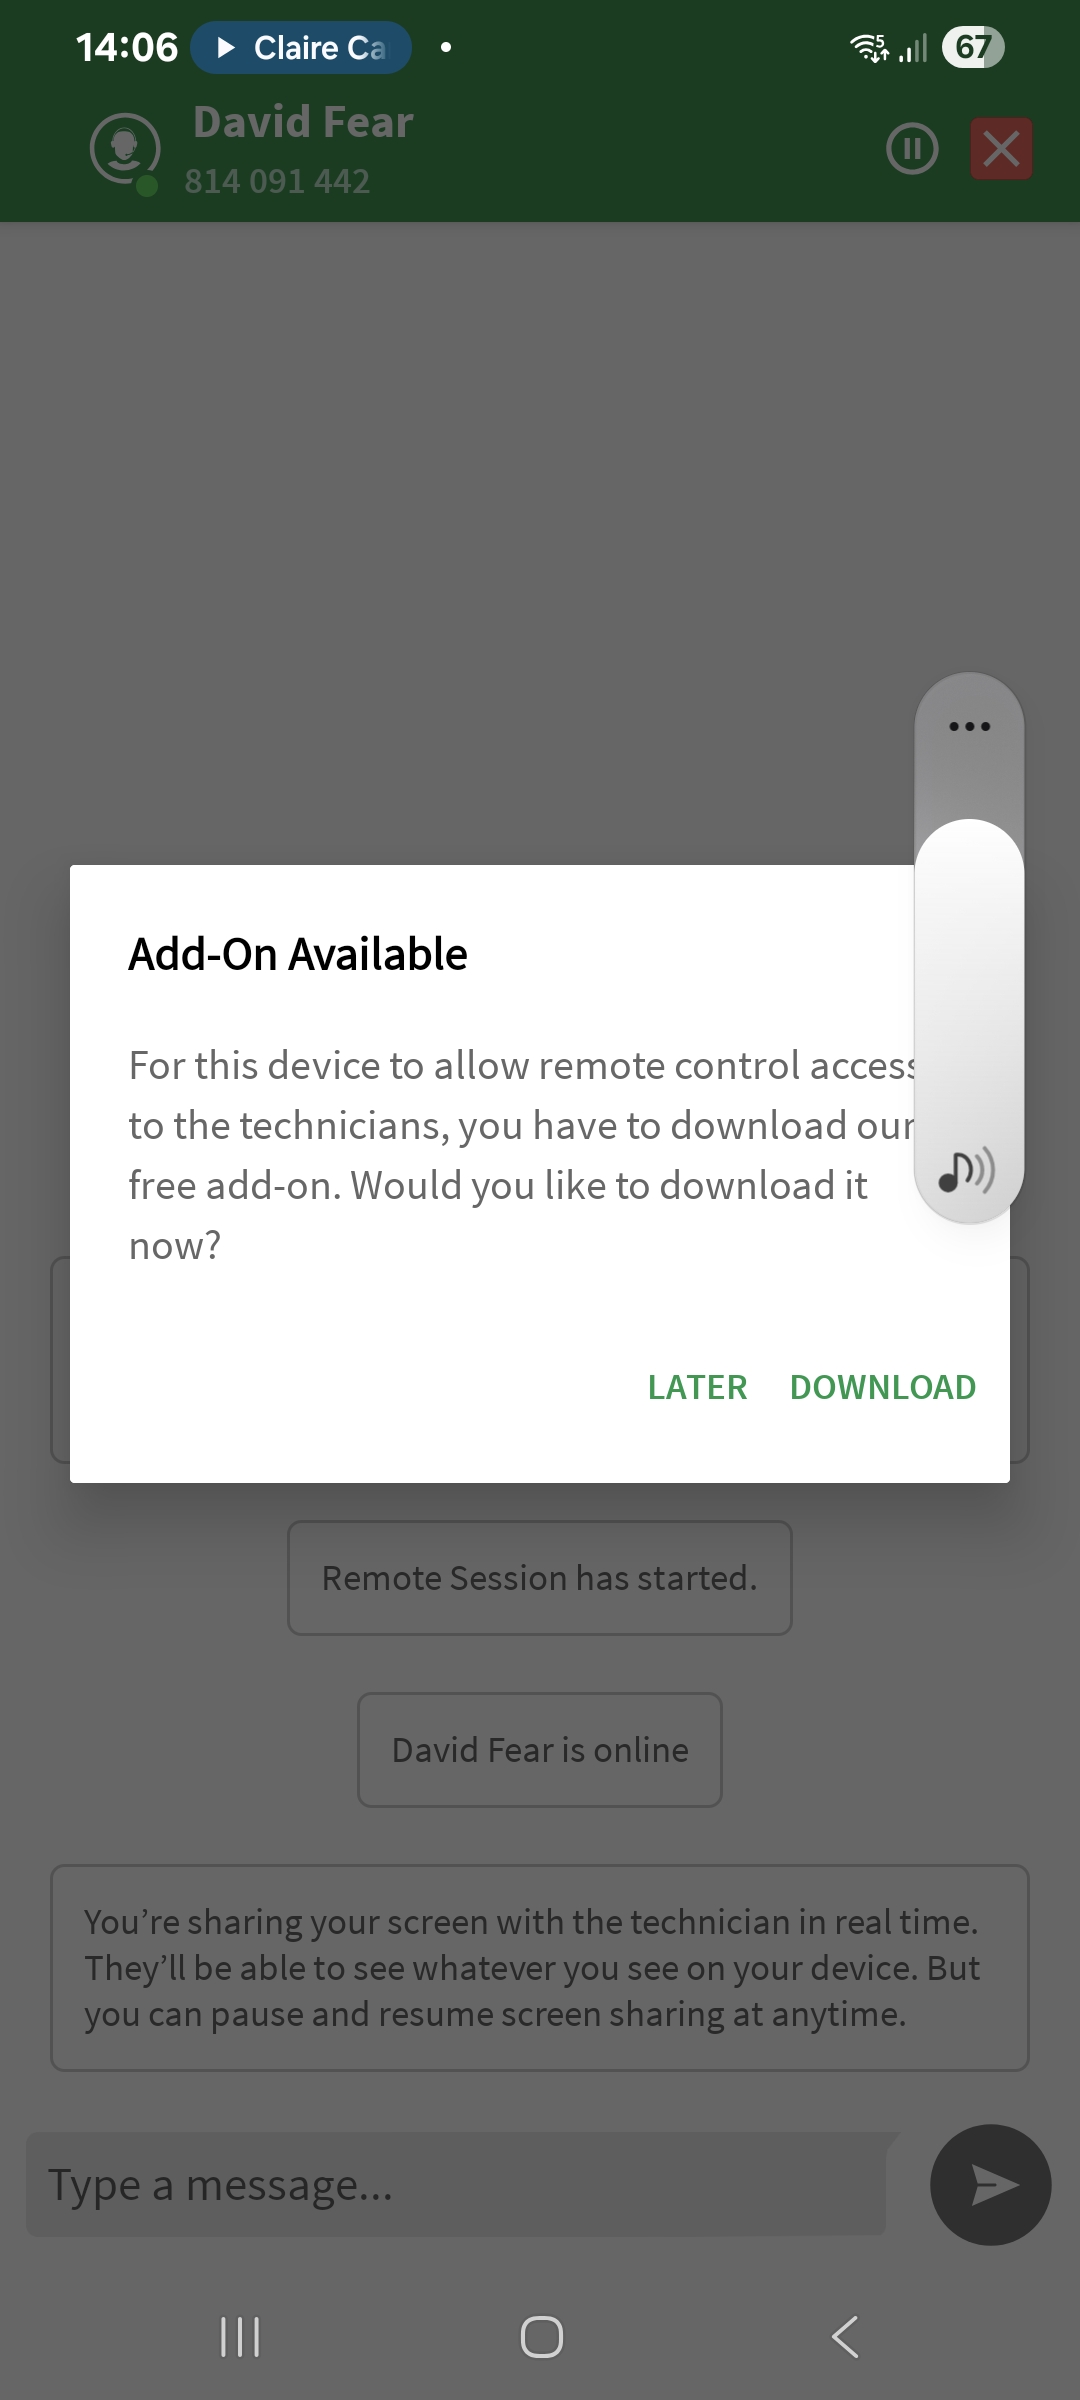
Step 7 – Install the required addon,
- In order to allow remote control access to the technician, you need to download an addon. .
- As shown in the first screenshot below, tap on download to open Google Play store.
- Tap on the install button to install the addon.
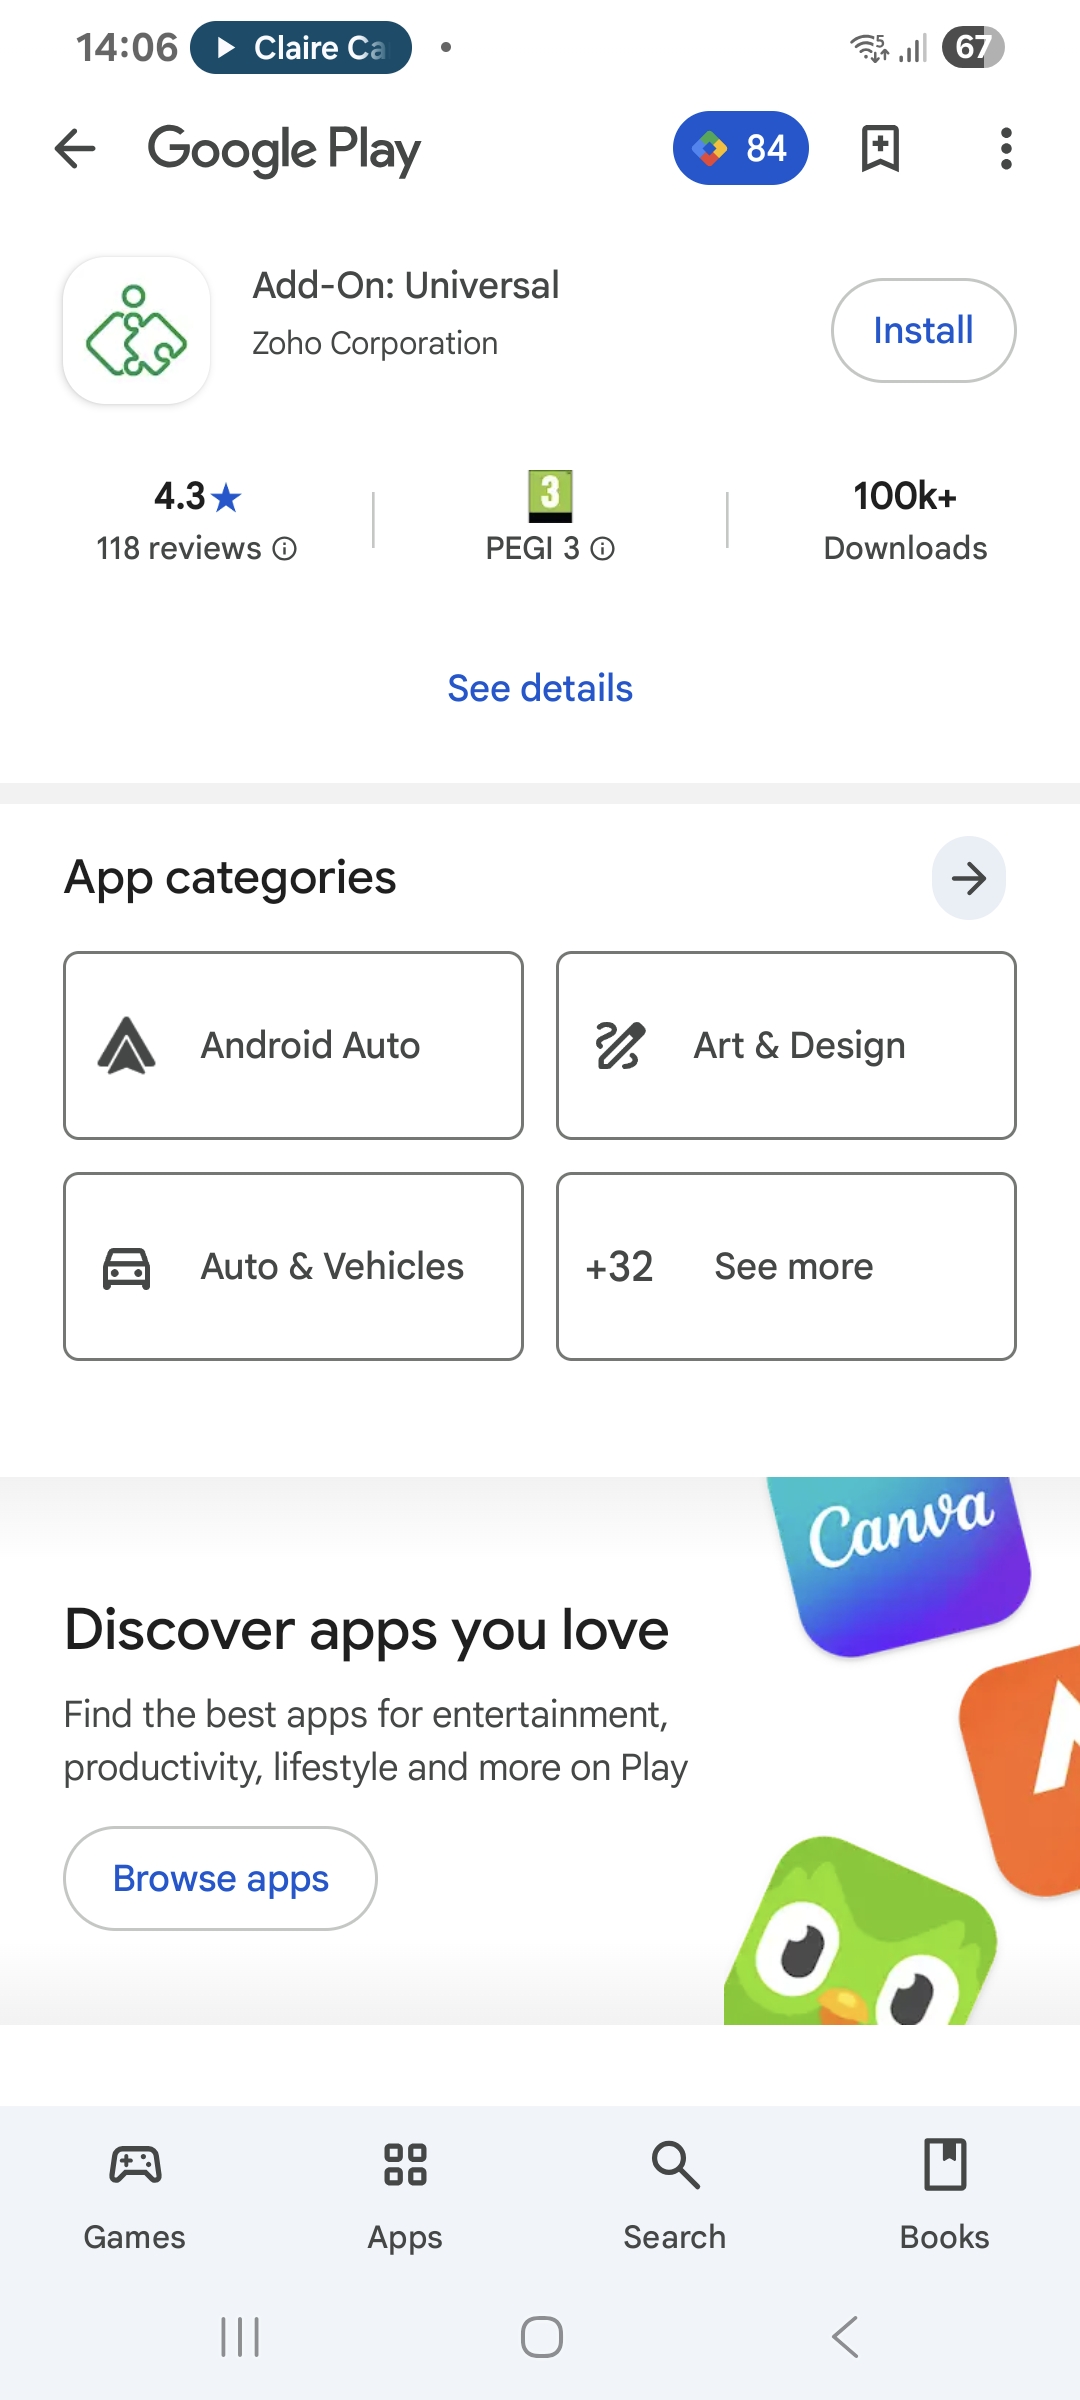
Step 8 – Enable accessibility,
- Tap on Open Accessibility to open accessibility settings in the settings app.
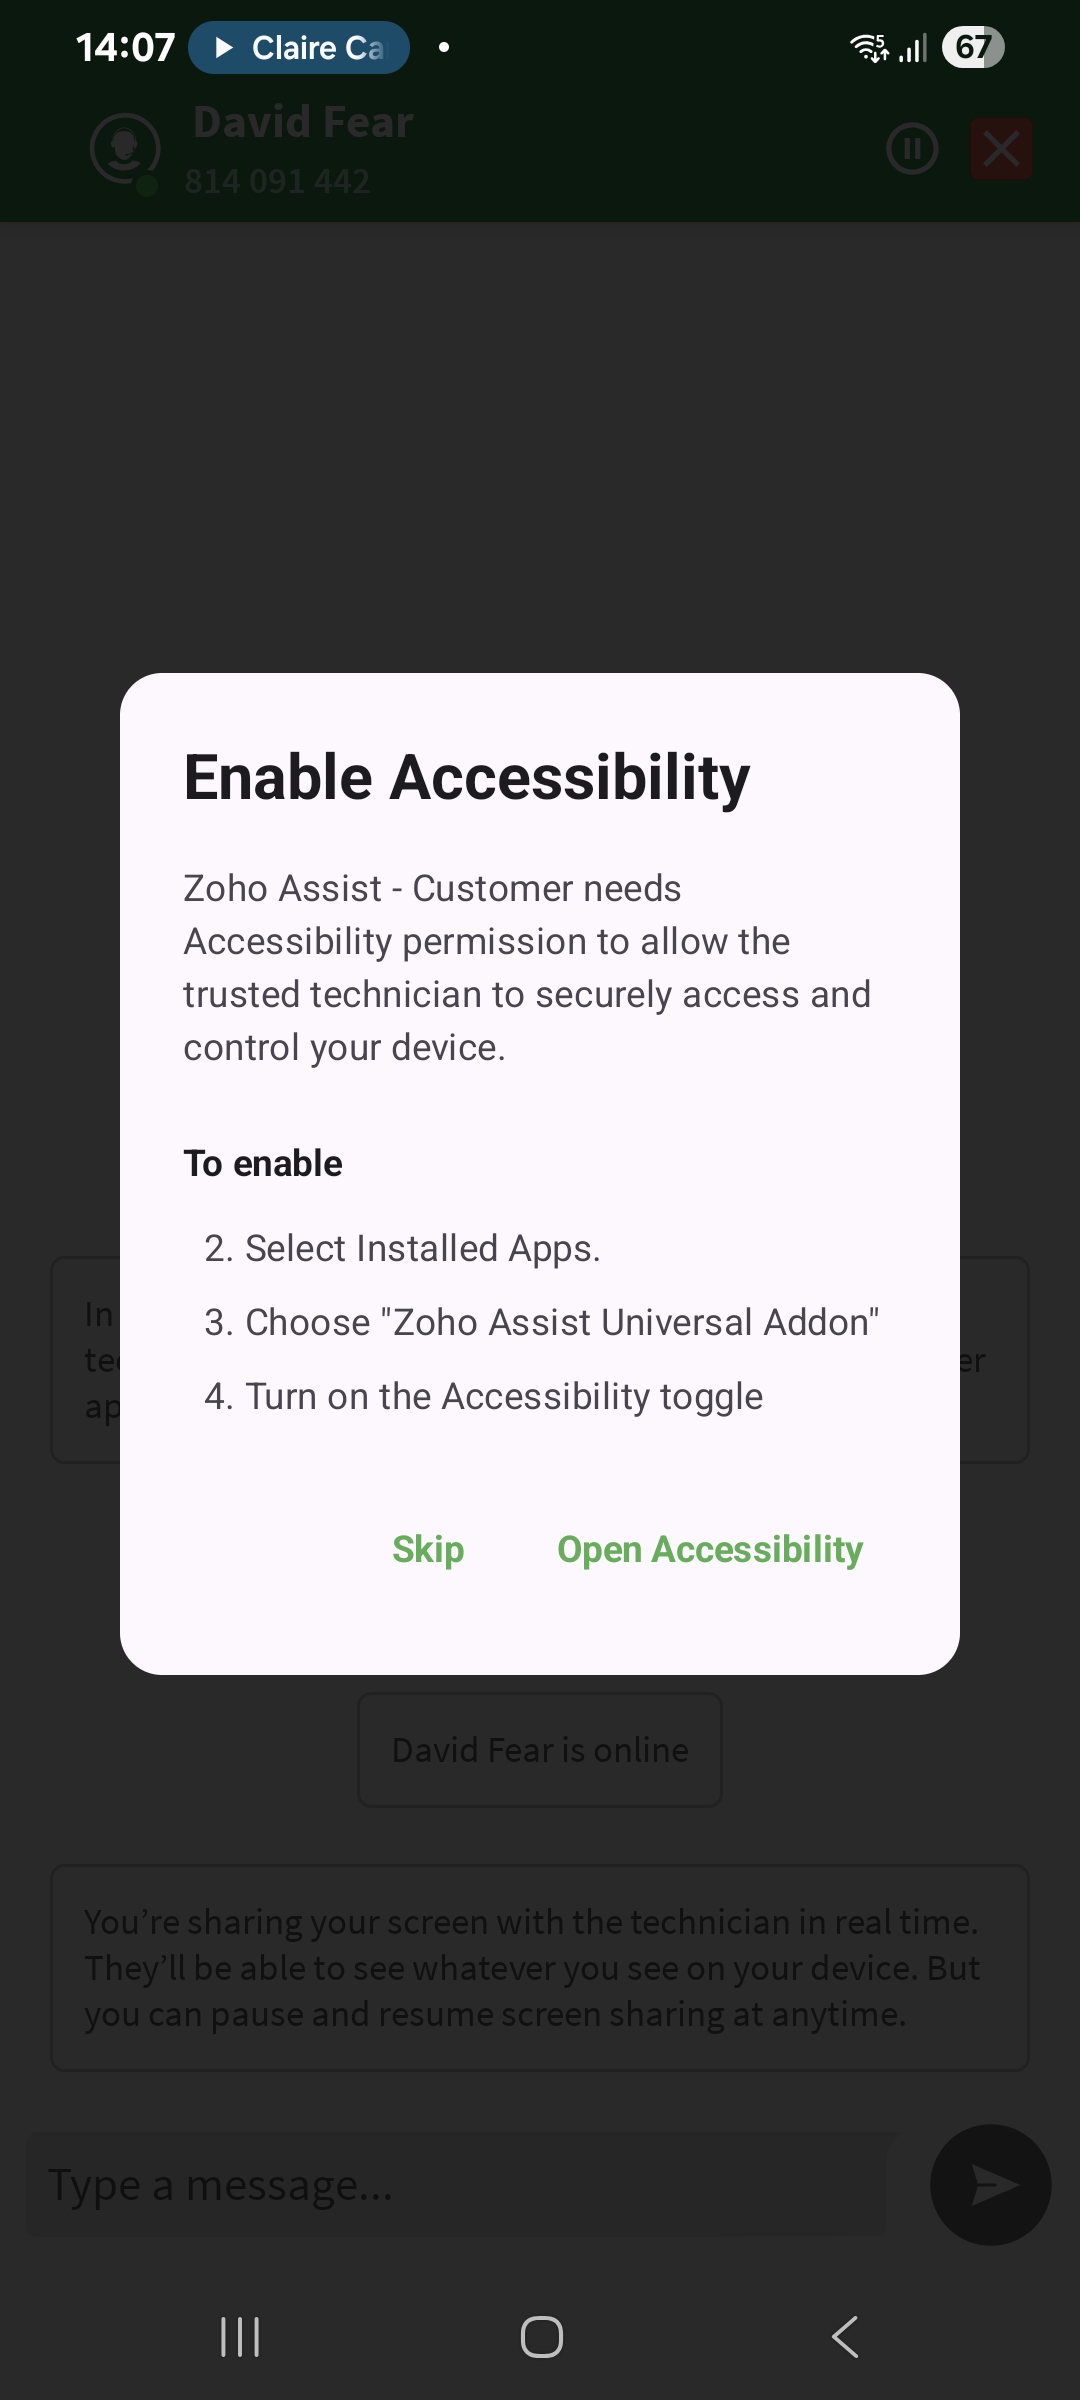
Step 9 Enable accessibility,
- Tap on Open Accessibility to open accessibility settings in the settings app.
- Tap on installed apps.
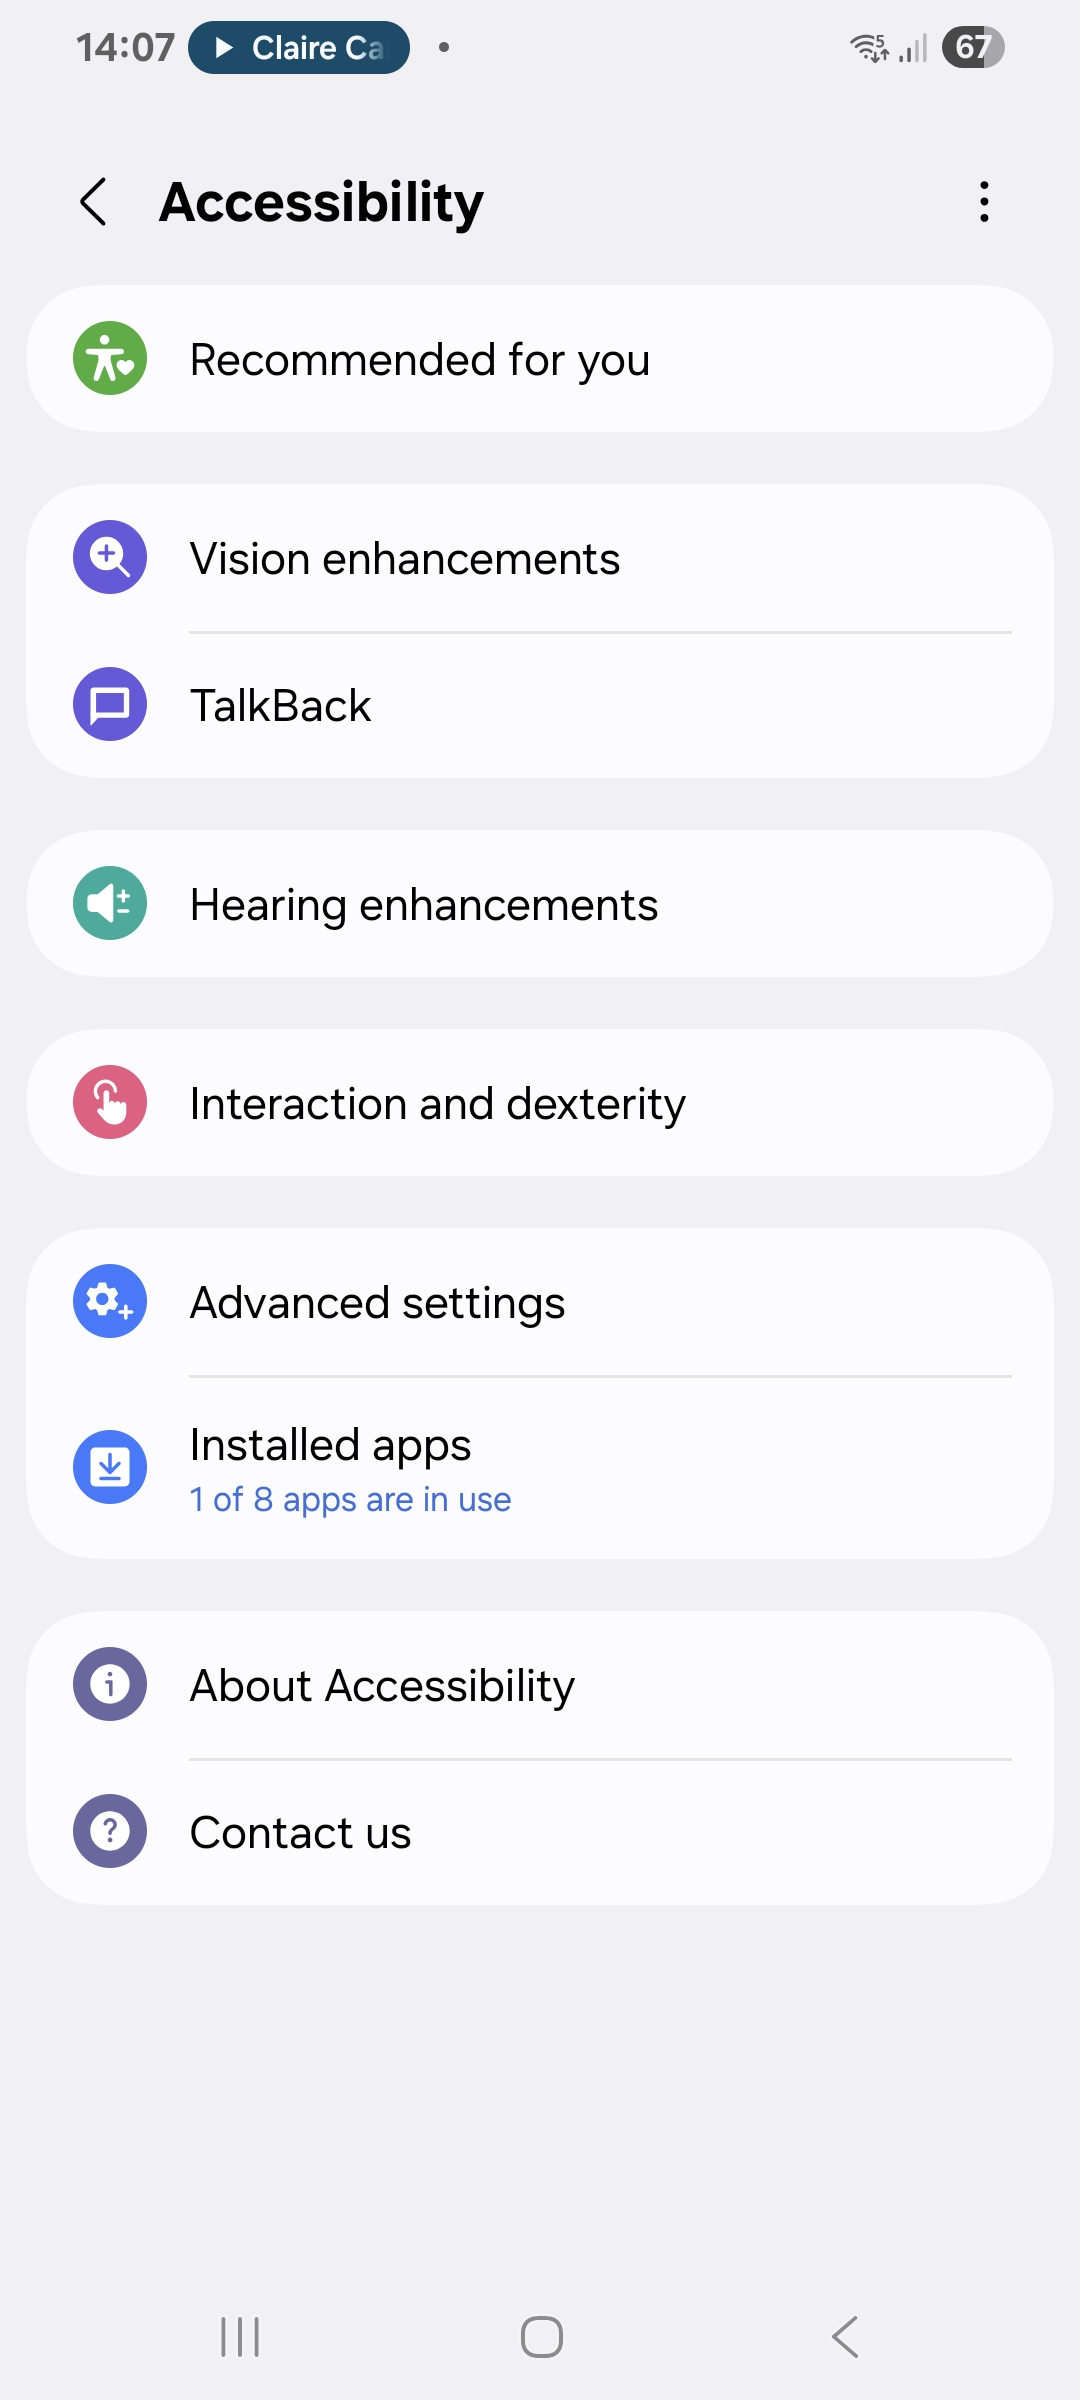
Step 10 Enable accessibility (continued),
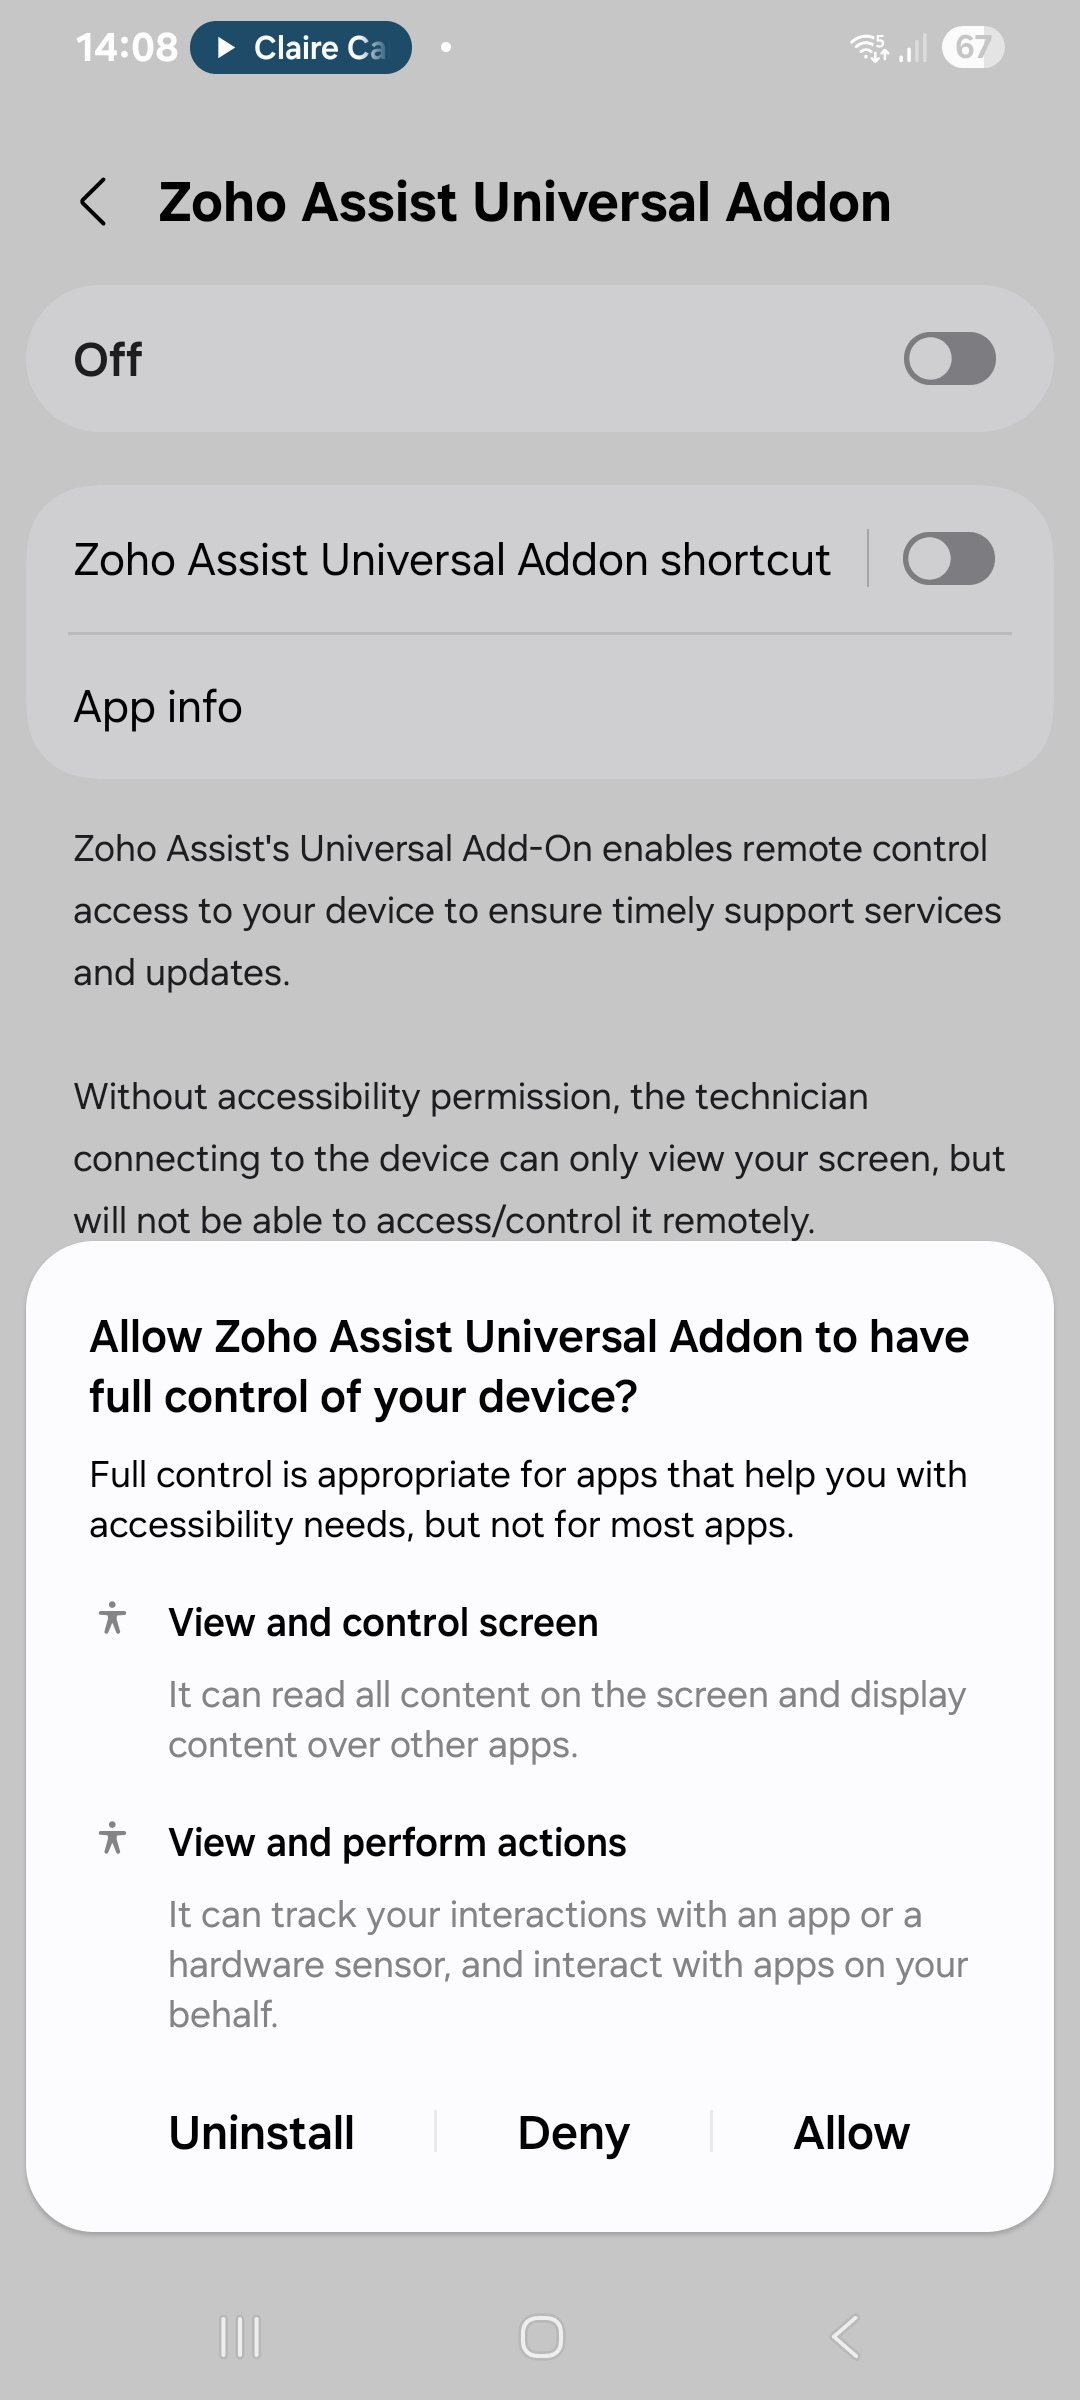
- Tap on Zoho Assist Universal Addon.
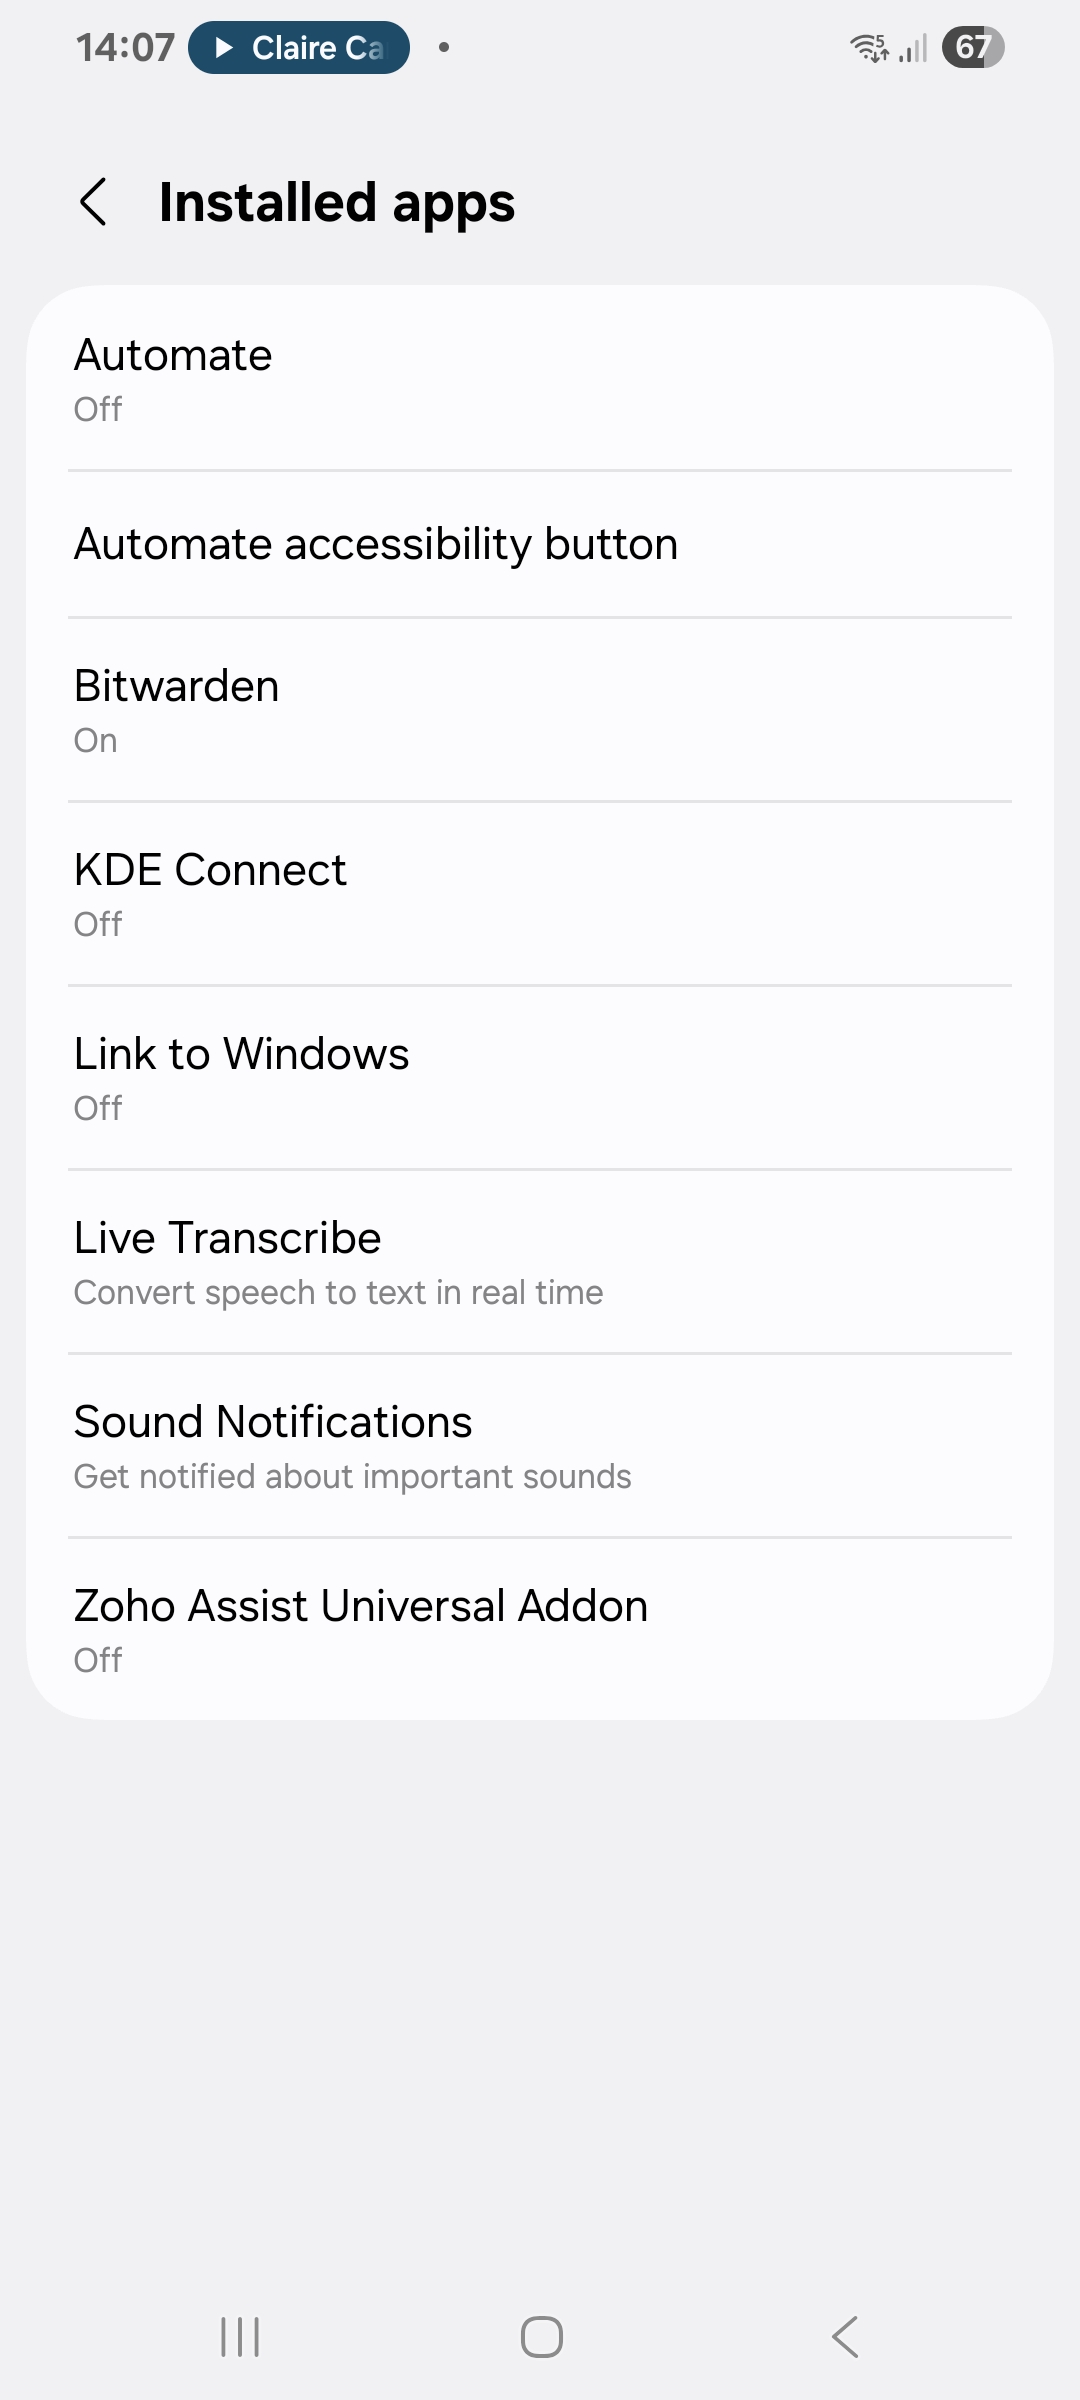
Step 9 – Enable accessibility (continued),
- Swipe or tap the Off toggle.
- Then tap on allow.
- Tap on the back button until you are back in the customer support app.
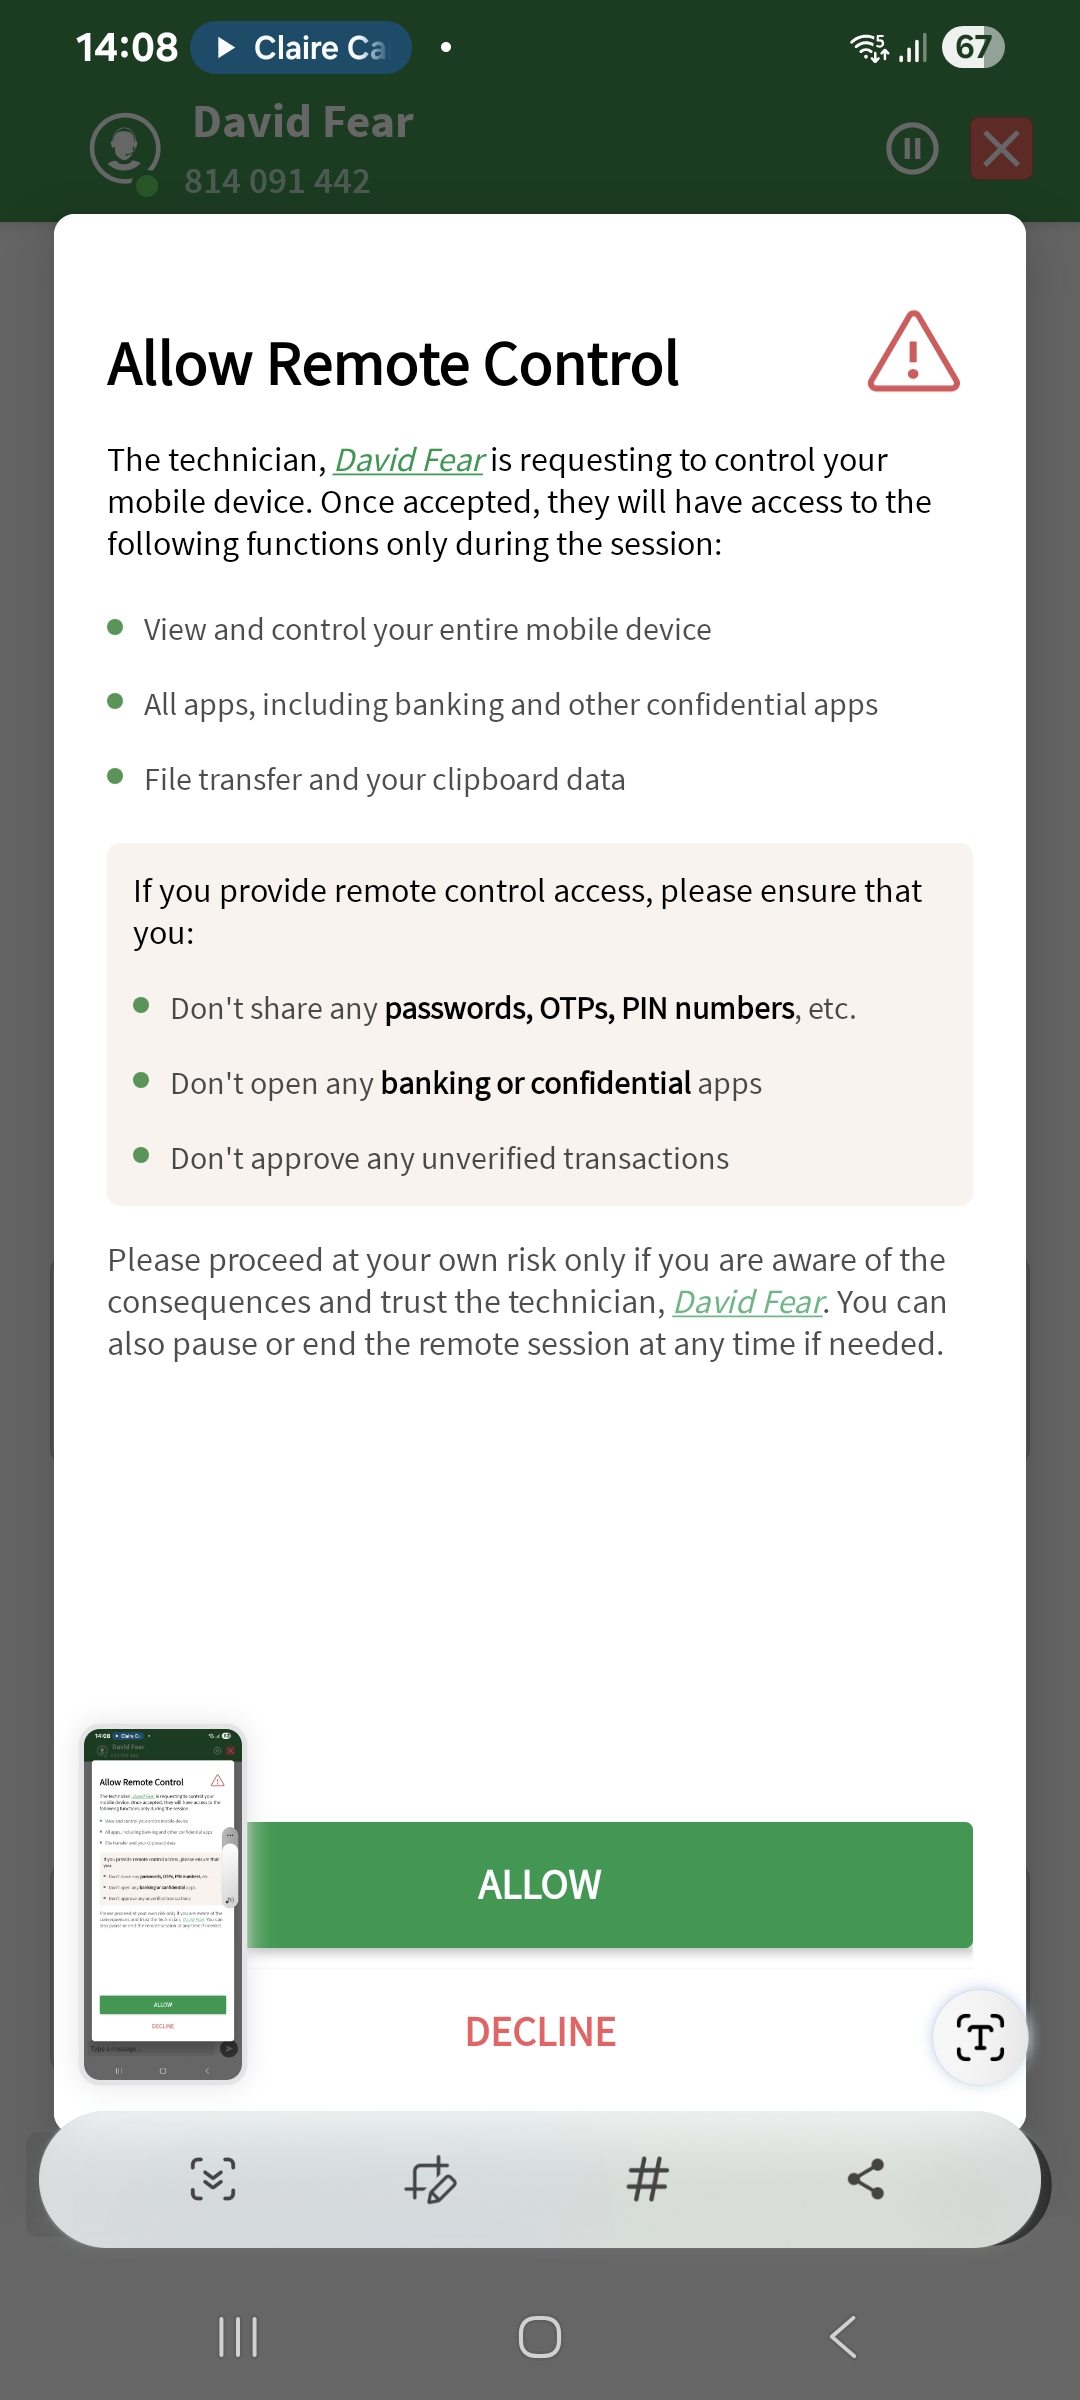
Step 10 – Allow Remote control,
- To allow remote control of you android device, tap on allow button.
- Your technician should now have access to your device.
Step 10 Ending a session.
- There are two ways to end the session:
- You can ask the technician to end session on their end, or they may end the session without being prompted (if they believe the session is finished).
Click the End Session button on the onscreen widget (which is normally in the bottom right-hand corner of your screen).
Step 1 Download customer support app from the Apple App store.

Step 2 Open the Customer support app.
Enter your email address when prompted.
Step 3 One time prompt
- The first time you open the app you will be shown the “usage data and crash information” sharing prompt.
- You can choose any of three options presented.
Step 4 – Joining a Session Using Quick Support.
- Enter the Session ID given to you by the technician.
- Tap Join Session.
Step 5 – Verify the technician
- If you are happy with the details presented on your screen (of the person who is trying to connect to your android device) tap on the checkbox, then tap the allow button.
Step 6 – screen casting option screen.
- You are presented with two options of what to share with the technician.
- The two options are: “Entire screen” or “Single app”.
- If you have asked the technician for general android support, select “entire screen”.
- Tap on the start button to continue.
Step 7 – Install the required addon,
- In order to allow remote control access to the technician, you need to download an addon. .
- As shown in the first screenshot below, tap on download to open Google Play store.
- Tap on the install button to install the addon.
Step 8 – Enable accessibility,
- Tap on Open Accessibility to open accessibility settings in the settings app.
Step 9 Enable accessibility,
- Tap on Open Accessibility to open accessibility settings in the settings app.
- Tap on installed apps.
Step 10 Enable accessibility (continued),
- Tap on Zoho Assist Universal Addon.
Step 9 – Enable accessibility (continued),
- Swipe or tap the Off toggle.
- Then tap on allow.
- Tap on the back button until you are back in the customer support app.
Step 10 – Allow Remote control,
- To allow remote control of you android device, tap on allow button.
- Your technician should now have access to your device.
Step 10 Ending a session.
- There are two ways to end the session:
- You can ask the technician to end session on their end, or they may end the session without being prompted (if they believe the session is finished).
Click the End Session button on the onscreen widget (which is normally in the bottom right-hand corner of your screen).
Is Pickle IT Support safe and secure?
Yes, very much! Remote desktop sessions can only be started by you. You have complete control of your PC throughout the entire session and can disconnect at any time by ending the Zoho Assist session.
What does Pickle IT charge for a remote assistance session?
All remote sessions are £30 per hour. You will be billed after a successful session has been completed.
For any tech issues that require an on-site visit,
there’s “Pickle IT on-site support.”
